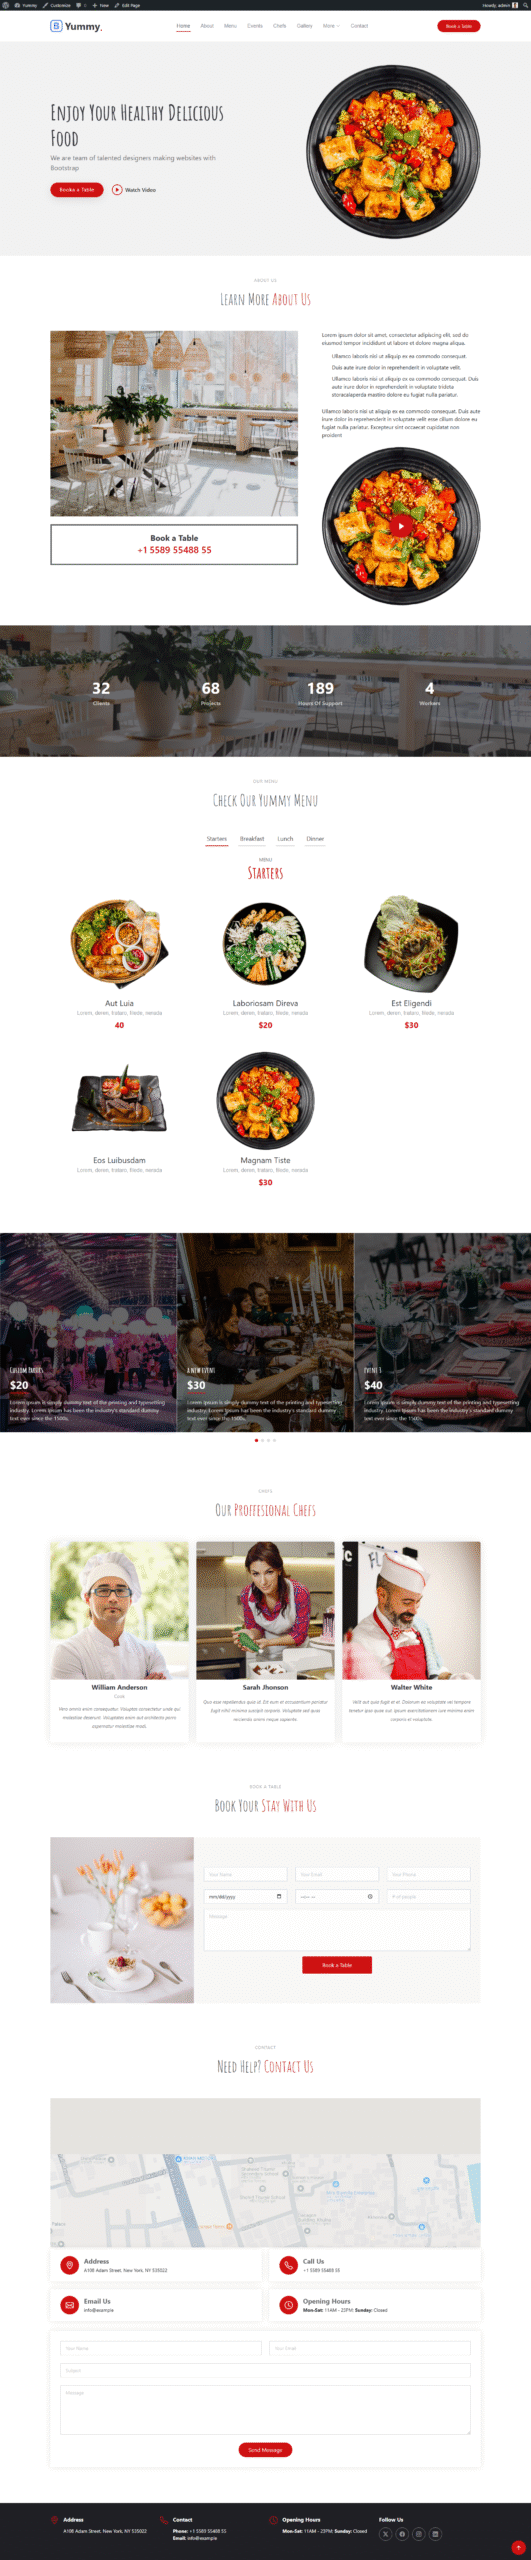
Yummy is a free WordPress restaurant theme for small food businesses. You can show your menus items using this free WordPress restaurant theme.
Yummy is mordan and lightweight free WordPress restaurant theme. It's develop especially for restaurants, bakeries, cafes, bars, catering, or anyone working in the food industry and is an attractive and effective way to promote your food-related businesses.
Key Features of the Free WordPress Restaurant Theme:
A primary menu
About section
Success information
Menu section
Event section
Our chefs section
Booking for menu items
Google Map integration
Contact information section
Contact form
Footer section
Necessary Services: I also offer a wide range of additional services to support your website needs. These include theme customization, on-page SEO, technical SEO, speed optimization, SMTP setup, CSS and JavaScript bugs fixing, custom plugin development, WooCommerce development, website or server transfer, Cloudflare configuration, SSL setup, and website security enhancement. Whether you’re looking to improve performance, fix issues, or add new features
I can also help you set up social media ad campaigns on platforms like Facebook, Pinterest, TikTok, LinkedIn, YouTube, and Google Search (paid ads). My services include developing effective social media strategies, conducting audience research, selecting the best campaign types, creating engaging ad content, and more. I’m here to help you every step of the way.
Note: The Yummy Restaurant website template was originally developed by BOOTSTRAPMADE I have converted this template into a fully functional WordPress theme, making it now usable on the WordPress platform.
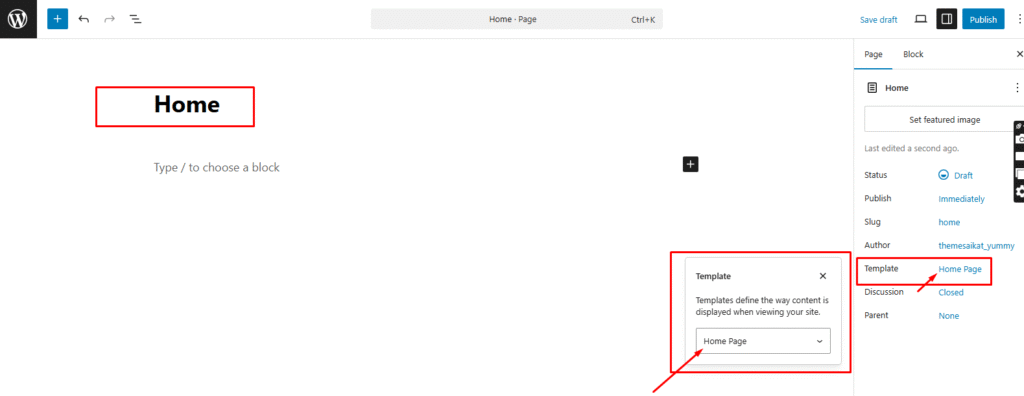
Here, I have explained the theme customization process with detailed documentation. First, download the theme from our website and install it. I hope you know how to install a WordPress theme. If you don’t, please watch a YouTube video tutorial. When you install the theme, you won’t see anything on the homepage at first. But don’t worry—after installation, go to the Pages section, create a homepage, and select the ‘Home Page’ template then publish the page.
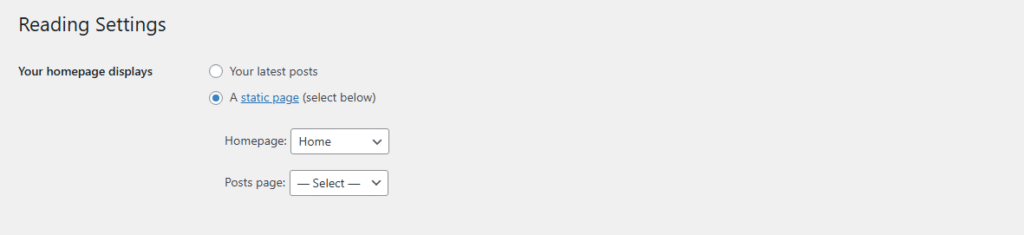
then go settings->reading and select a static page -> Home then save.
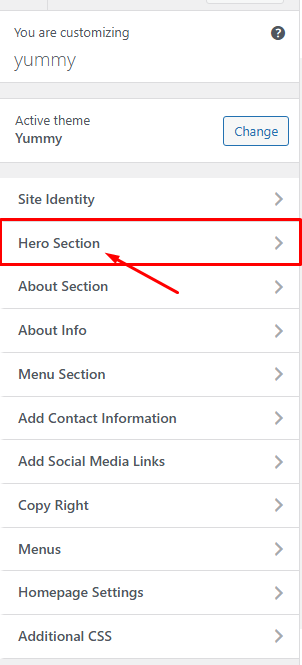
Now the site is live, and you can see the website. However, some elements are still missing. Now, I will walk you through the whole customization process step by step. You should now see the customization pencil icon at the top of the admin bar. Click on it to start customizing.
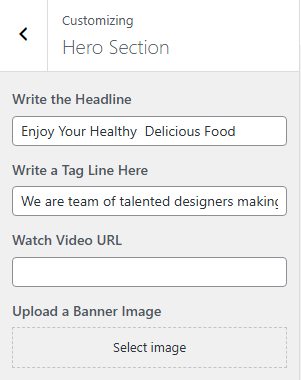
Now, you will see all the customization sections. First, go to the Hero Section. When you click on it, the section will open, and you will see the input boxes for the following:
Write the Headline
Write a Tagline here
Watch Video URL
Upload a Banner Image
Now, you can customize the other sections. Let me explore the important sections, like creating a menu and managing chefs’ profiles.
How do you add menu items?
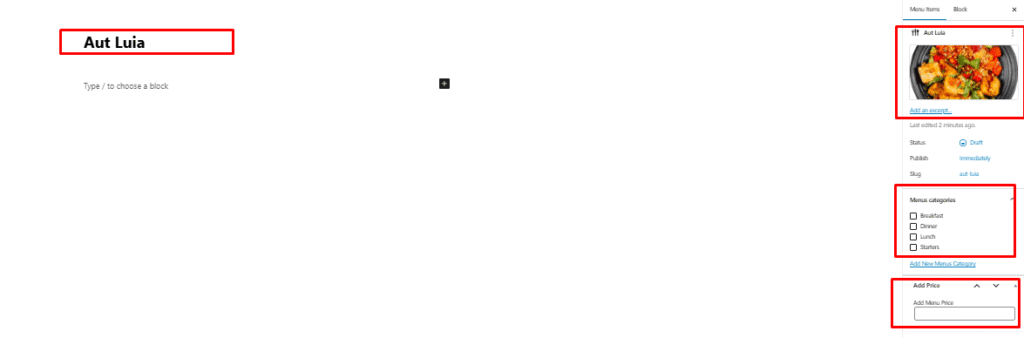
Maybe when you installed the theme, you didn’t see the menu section, right? That’s because it won’t appear until you add a new menu item. So, to add a new menu item, go to ‘Menu Items‘—you’ll find it under ‘Posts‘—then click ‘Add Post‘.
Set a menu title and image, check a menu category, and add the price of the item. Then save it as a draft—don’t publish it.
How do you add a new event?
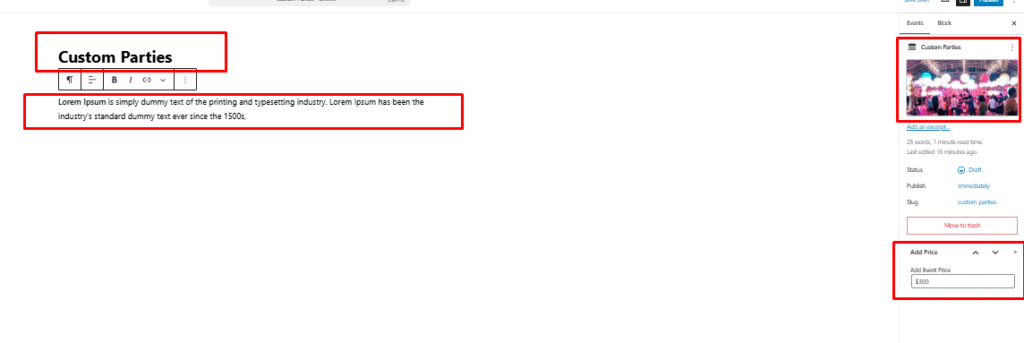
When you install the theme, you won’t see the event section because no events are available. Once you add a new event, the event section will appear. Until then, it will not be visible. Add a new event go Events add a new post and save as draft.
Add the event title, featured image, event price, and description. Once you create an event, the event section will appear on the webpage.
How do you add a new Cheaf profile ?
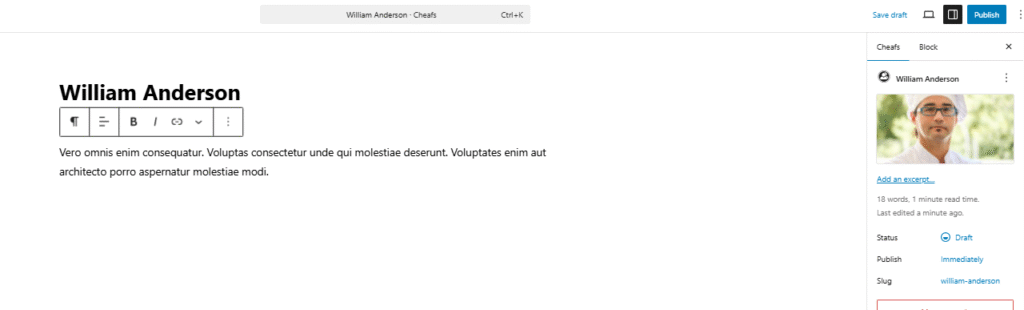
When you install the theme, you won’t see a single Cheaf profile and this section untill you will not create a single profile. Once you add a new Cheaf profile the Cheaf section will appear. Add a new Cheaf go Cheafs add a new post and save as draft.
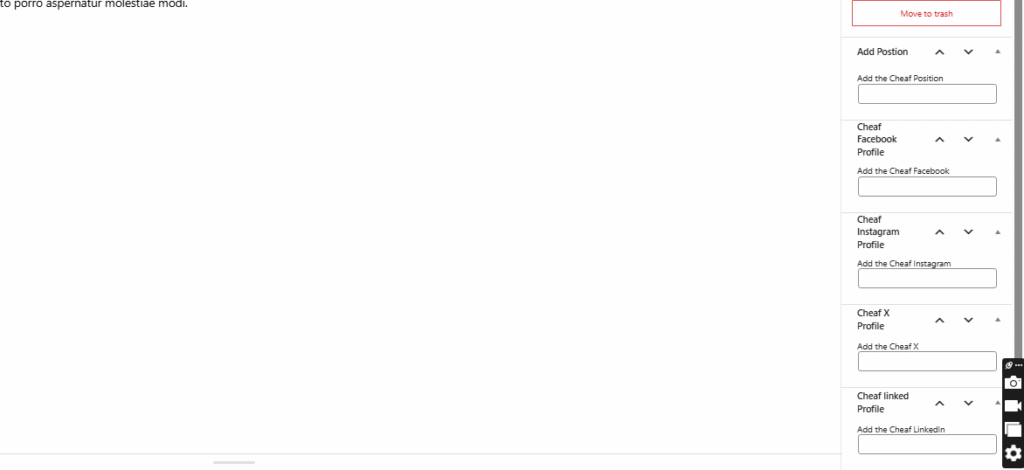
Add the chef’s name as the title, and write a description about the chef in the content area. Set a featured image to use as the chef’s photo. Below that, add the chef’s position and include social media links such as Facebook, Instagram, Twitter (X), and LinkedIn. Once done, save it as a draft.
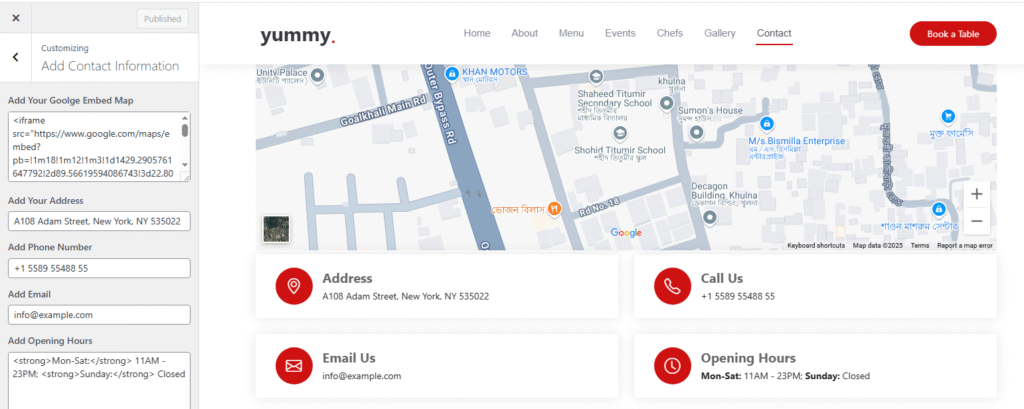
How do you add your store contact information?
To add your store’s contact information, go to Appearance → Customize → Contact Information. From there, you can enter your address, phone number, email, and other contact details.
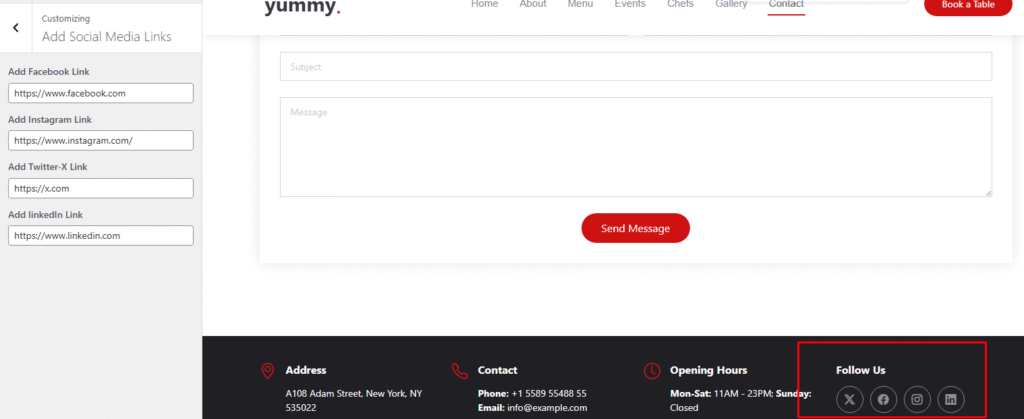
Now, enter your contact information one by one, and then click Publish to save the changes. Add Social media links you have to go Appearance → Customize → Add Social Media Link.
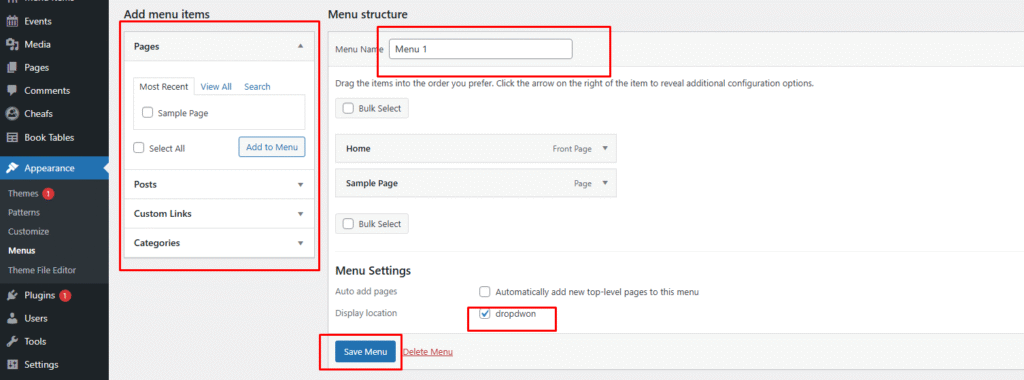
Now, add your store’s social media links, and then click the Publish button to save the changes. One more thing—if you have several pages on your website, you might want to create a new menu and add those page links to it. So, how do you do that? Let me explain. Go Appearance – > Menus
To create a new menu, go to Appearance → Menus, then click Create a new menu and give it a name. After that, select the pages you want to include, check the dropdown options if needed (for sub-menus), and finally click Save Menu.
Once you save the menu, it will appear at the top of the website in the header as the main menu, along with a “More” dropdown button for additional items.
This concludes the basic theme customization guide. If you encounter any issues or need any assets, feel free to contact me—I’m always available to help. Thank you!
Custom WordPress Restaurant Website Offer
I’m offering to build a custom WordPress restaurant website at an affordable price.
A unique and well-designed website can increase your brand authority and boost your sales. A custom, good-looking site not only helps grow your business but also leaves a lasting impression on your visitors.
If you're interested in building a custom restaurant website, I can help you as a full-stack web developer. The website will include the following features:
Header with dynamic menus
Hero section
Menu items
Chefs’ profiles with social media links
Event section
About section
Blog
Contact form with Google Map integration
Booking functionality with payment gateway
Footer section
I will add more features as per your requirements.
Here are a few questions I’ve answered before making a deal:
How long will it take to build a custom restaurant website?
Generally, it takes 15–45 days. But if you want a well-designed website, you should give me time to think about a unique design.
Will you provide basic SEO service?
Yes, if you build a website with me, I will provide basic on-page and technical SEO services for free.
Which languages will you use to make the restaurant website?
I will use HTML, CSS, JavaScript, and PHP along with the WordPress CMS to build the restaurant website.
Can I customize this theme using Elementor?
Yes, you can configure and customize this theme using Elementor. I’m also experienced in Elementor development, so if you need any help, I’m here to assist you.
If you want to build your website on other platforms, I can help with that too. Whether you prefer Shopify, Laravel, Vue.js, or React.js, I have the skills and experience to assist you in creating a fully functional and customized website. I will also assist you with domain and hosting purchase, server transfer, Google Analytics (GA4) setup, Google Tag Manager configuration, Facebook Pixel and Conversion API integration, as well as setup for other social media platforms like Pinterest, TikTok, and LinkedIn.